
Quick Answer:
Indoor composting is the process of turning kitchen scraps into compost inside your home using aerobic bins, worm composting, Bokashi, or electric composters. When properly managed, an indoor compost system should not smell and can produce usable compost in as little as two to five weeks.
The most effective ways to compost indoors without odor are:
- Keep a balanced ratio of browns to greens (about 1:1 by volume)
- Maintain moisture like a wrung-out sponge—not too wet, not too dry
- Choose a bin with a tight-fitting lid
- Bury food scraps under 2+ inches of bedding material
- Turn the compost weekly
Common Indoor Compost Problems at a Glance
| Problem | Most Common Cause | Quick Fix |
|---|---|---|
| Ammonia / sour smell | Too many greens, not enough browns | Add 2-3 handfuls of shredded cardboard or newspaper |
| Fruit flies | Food scraps left exposed on surface | Bury food under 2+ inches of bedding material |
| Mold (white) | Not enough air circulation | Turn the compost, loosen packed materials |
| Mold (black) | Too much moisture + poor airflow | Remove affected material, add dry browns, increase turning |
| Worms escaping | Too acidic or too wet | Add crushed eggshells to neutralize acidity |
| Compost not breaking down | Too many browns or too dry | Add more greens or sprinkle water while turning |
Indoor Compost Success Checklist
Use this checklist to track your progress:
Setup
☐ Bin with tight-fitting lid and ventilation holes
☐ Bedding ready (shredded newspaper or cardboard)
☐ Browns stored nearby (cardboard, paper, dry leaves)
☐ Kitchen caddy with compostable liner (40-60 GSM)
☐ Small trowel for burying scraps
Daily Habits
☐ Add food scraps to caddy
☐ Add equal amount of browns
☐ Bury food scraps under bedding
☐ Empty caddy every 2-3 days
Weekly Maintenance
☐ Turn compost with trowel
☐ Check moisture (wrung-out sponge feel)
☐ If too wet: add cardboard
☐ If too dry: sprinkle water
☐ Replace caddy liner
Ongoing Rules
☐ No meat, dairy, or oily foods
☐ No pet waste
☐ Keep bin in cool, dark place
☐ Add crushed eggshells for worms (if using vermicomposting)
Key Takeaways
- Indoor composting is possible in any space—apartment, condo, or small home
- Odor is the #1 concern, but it’s preventable with proper balance
- Three main methods: worm composting, aerobic composting, and Bokashi
- Finished indoor compost typically takes 2–5 weeks with proper management
The #1 Reason Indoor Compost Starts Smelling
The biggest mistake we see: adding food scraps without enough brown material.
Based on recurring customer support cases involving compostable kitchen liners and indoor composting, the most common issue isn’t the bin, the worms, or the liners—it’s the brown-to-green ratio.
Most people remember to add food scraps (greens). Most people forget to add shredded paper, cardboard, or dry leaves (browns). According to the U.S. Environmental Protection Agency, your compost pile should have an equal amount of browns to greens. The result? Within 3-5 days without enough browns, the bin smells like ammonia.
The fix is simple: add 2-3 handfuls of shredded cardboard or newspaper every time you add food scraps. If you already have odor, add browns immediately and turn the pile. Most odor problems resolve within 48 hours.
Why Choose Indoor Composting?
According to the EPA, food scraps and yard waste together make up 20 to 30 percent of what we throw away. Composting keeps these materials out of landfills where they release methane, a potent greenhouse gas.
The Cornell Waste Management Institute provides extensive resources on composting science and practices. Indoor composting offers several advantages:
- Year-round operation — not subject to weather
- Space-efficient — perfect for apartments and small homes
- Odor control — properly managed bins don’t smell
- Convenient access — located right in your kitchen
Apartment composting is particularly popular because it requires no outdoor space and can be done entirely in a kitchen, closet, or balcony.
Expert Tips for Indoor Composting
Expert Tip #1: Freeze scraps when you’re away
If you’re leaving for a few days, freeze your food scraps instead of leaving them in the caddy. Frozen scraps resume decomposition when thawed and returned to the bin. This prevents odor buildup while you’re away.
Expert Tip #2: Cut scraps into smaller pieces
Smaller particles decompose faster. Cut fruit peels, cores, and vegetable trimmings into 1-2 inch pieces before adding to the bin. This increases surface area for microbes and speeds up the process significantly.
Expert Tip #3: Avoid adding whole watermelon rinds
Watermelon and melon rinds release large amounts of water within 24 hours. If you add them, chop them into small pieces and add extra cardboard at the same time to absorb the moisture. Whole rinds can make the bin too wet and trigger odor problems.
Why Trust This Guide
This guide combines:
- U.S. Environmental Protection Agency composting guidance
- Cornell Waste Management Institute publications
- TÜV Austria certification standards for compostable products
- More than 10 years of compostable packaging manufacturing experience
- Recurring customer support inquiries collected over the past decade
- Product performance observations from real household use
The recommendations in this guide reflect actual patterns observed from users and recurring customer support cases—not laboratory theory.
Common Indoor Composting Myths
| Myth | Truth |
|---|---|
| ❌ Indoor compost always smells bad | ✅ A properly managed bin has an earthy smell, not odor |
| ❌ Compost attracts rats and pests | ✅ Only poorly managed bins with exposed food scraps attract pests |
| ❌ You need a backyard to compost | ✅ Apartments work perfectly—worm bins and Bokashi are designed for small spaces |
| ❌ Composting takes months | ✅ Indoor aerobic bins can finish in 2-5 weeks |
| ❌ You need special equipment | ✅ A 5-10 gallon plastic bin with holes works fine |
| ❌ Compostable bags don’t break down indoors | ✅ Certified liners break down in composting systems, not inside the bin itself |
Indoor Composting vs Outdoor Composting
| Factor | Indoor Composting | Outdoor Composting |
|---|---|---|
| Space required | 2-5 square feet | 10+ square feet |
| Year-round use | Yes | Limited by climate |
| Odor control | Essential—must manage carefully | Less critical |
| Pest risk | Low—if properly managed | Higher—exposed to wildlife |
| Speed | 2-5 weeks (aerobic) | 3-12 months (traditional) |
| Maintenance | Weekly turning | Seasonal turning |
| Best for | Apartments, condos, small homes | Homes with yards |
| Can compost meat/dairy | Only with Bokashi | Yes—hot piles only |
Which Indoor Composting Method Is Best?
Decision Tree
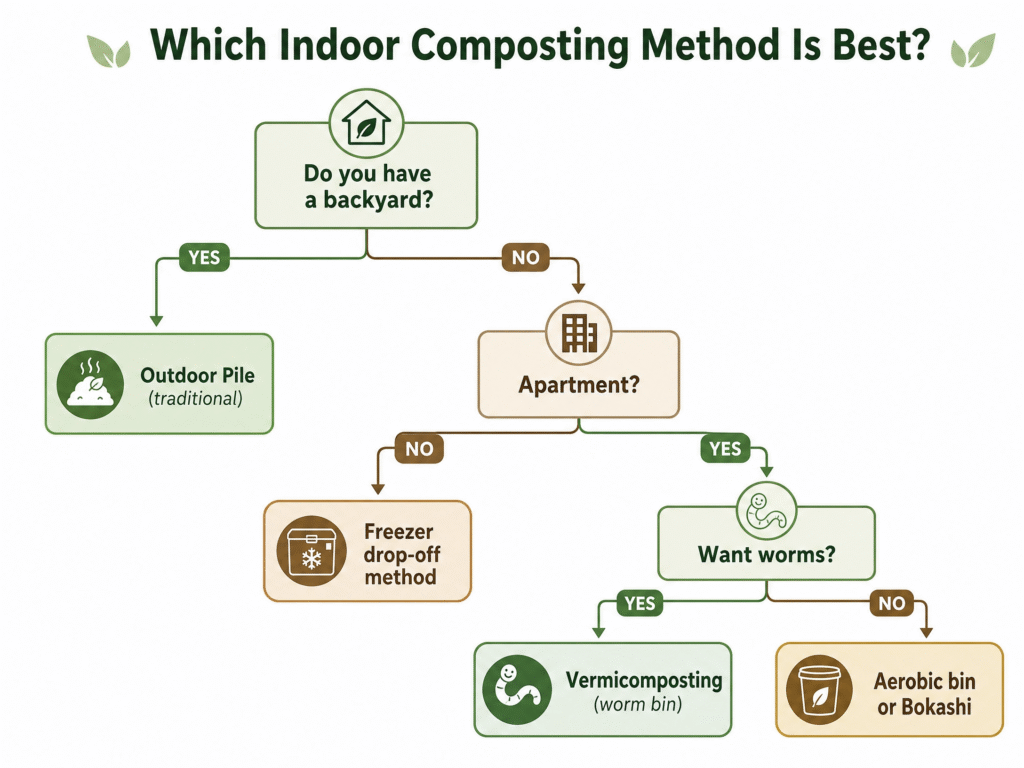
Method Comparison Table
| Method | Odor Control | Speed | Apartment-Friendly | Maintenance | Best For |
|---|---|---|---|---|---|
| Vermicomposting | ★★★★★ | ★★★★ | ★★★★★ | ★★★ | Small households, plant owners |
| Bokashi | ★★★★★ | ★★★★★ | ★★★★★ | ★★★★ | Meat/dairy composters |
| Aerobic Bin | ★★★★ | ★★★ | ★★★★ | ★★ | Beginners |
| Electric Composter | ★★★★★ | ★★★★★ | ★★★★★ | ★★★★★ | Tech-savvy users |
| Freezer + Drop-off | ★★★★★ | N/A | ★★★★★ | ★★★★★ | One-person households |
Best Indoor Compost Bin Recommendations
Before choosing a kitchen compost bin, consider your household size and daily food scrap volume.
| Bin Type | Price Range | Capacity | Best For | Notes |
|---|---|---|---|---|
| DIY 5-gallon bucket | $5-$15 | 5 gallons | Budget beginners | Drill holes for airflow |
| Countertop caddy (small kitchen compost bin) | $15-$30 | 1-2 gallons | Daily kitchen collection | Charcoal filter optional |
| Worm bin | $30-$70 | 5-10 gallons | Worm composting | Dark plastic; pre-drilled |
| Bokashi bucket | $40-$60 | 5 gallons | Meat/dairy composting | Airtight with spigot |
| Electric composter | $300-$600 | 2-5 gallons | Tech-savvy users | Fastest processing |
Bin Size by Household
| Household Size | Recommended Bin Size | Why |
|---|---|---|
| Studio / 0-1 person | 2 gallons | Fits under sink |
| 1 bedroom / 1-2 persons | 3 gallons | Most common |
| 2 bedrooms / 2-3 persons | 5 gallons | More capacity |
| 3+ bedrooms / family | 5-10 gallons | Outdoor or worm system |
According to Cornell University’s worm composting guide, a good size bin for most households is a 5- to 10-gallon container, approximately 24″ x 18″ x 8″. The box should be shallow rather than deep, as red wigglers are surface-dwellers that prefer to live in the top 6 inches of material.
What Can Be Composted Indoors
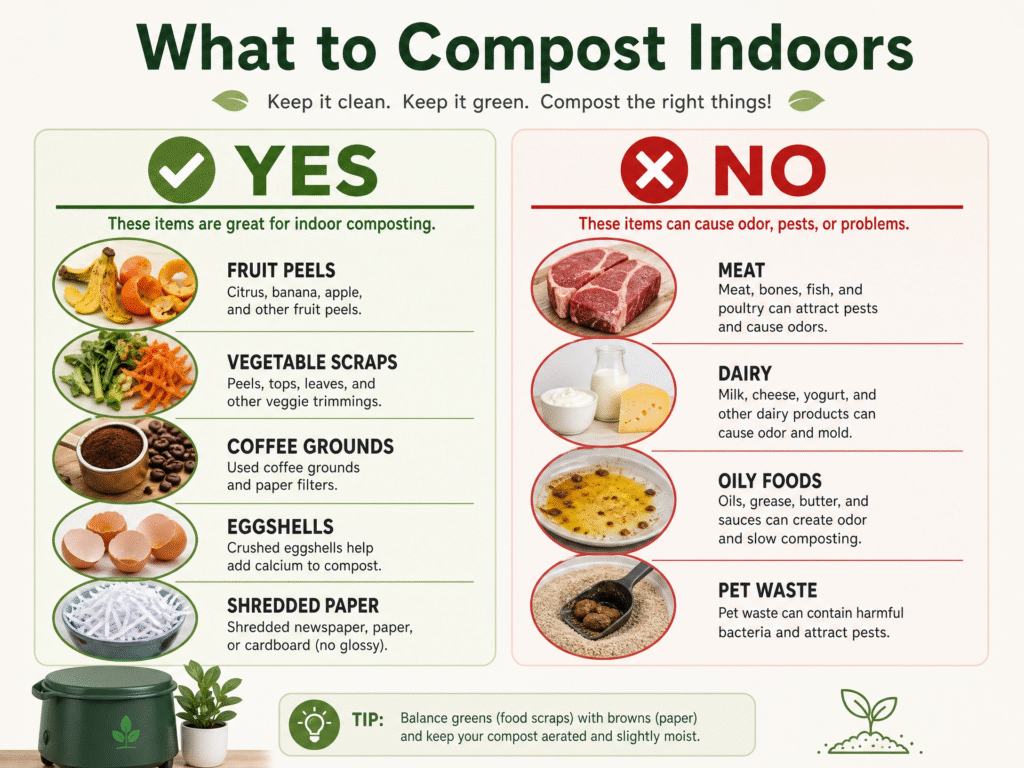
✅ Yes — Safe for Indoor Composting
According to Cornell’s worm composting guide, recommended materials include raw fruit and vegetable scraps, coffee grounds, tea leaves, eggshells, and shredded paper. The EPA also recommends using an equal amount of browns to greens.
| Category | Examples |
|---|---|
| Fruit and vegetable scraps | Peels, cores, leftovers |
| Coffee grounds and paper tea bags | Used grounds, loose tea leaves |
| Eggshells | Washed and crushed |
| Shredded paper and cardboard | Non-glossy, uncoated |
| Houseplant residues | Dead leaves, used potting soil |
❌ No — Avoid for Indoor Composting
According to the EPA, avoid these materials in home compost:
| Category | Why Avoid |
|---|---|
| Meat, fish, bones | Attract pests, slow decomposition, foul odors |
| Dairy products (butter, milk, sour cream, yogurt) | Create odor problems and attract pests |
| Fats, grease, lard, or oils | Create odor problems and attract pests |
| Pet wastes (dog/cat feces, soiled litter) | May contain pathogens harmful to humans |
| Diseased plants | Diseases or insects might survive and be transferred back to other plants |
Cornell University also recommends avoiding orange rinds and other citrus fruits (too acidic, can attract fruit flies), as well as onions and broccoli which tend to have a strong odor.
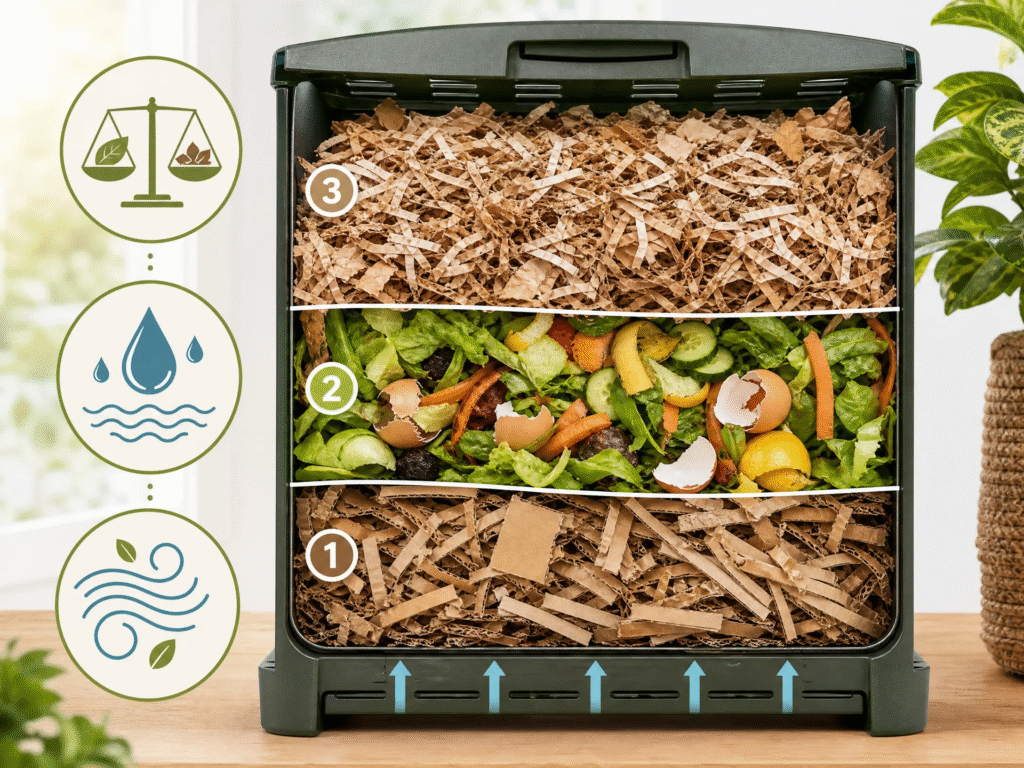
The Secret to Smell-Free Composting
The 4 Rules
1. Maintain equal browns to greens (by volume)
The EPA recommends an equal amount of browns to greens. The brown materials provide carbon for your compost, the green materials provide nitrogen, and the water provides moisture to help break down the organic matter. If high-moisture fruit scraps (watermelon, melon rinds) are added, they release significant water within 24 hours—add cardboard immediately.
2. Control moisture
The materials should feel like a wrung-out sponge—moist but not dripping. Squeeze test: if water drips, it’s too wet. If nothing sticks, it’s too dry.
3. Bury food scraps
Never leave food waste on the top layer. According to Cornell’s worm composting guide, bury food scraps under 2+ inches of bedding to prevent pests and odors.
4. Turn weekly
A weekly turn (every 5-7 days) introduces oxygen and prevents anaerobic conditions. According to the EPA, a properly managed compost bin will not attract pests or rodents and will not smell bad.
Most Common Customer Problems
Based on recurring customer support inquiries collected over the past decade, here are the most frequently reported issues:
Top Problems Reported by Users
| Issue | Frequency | Root Cause |
|---|---|---|
| Odor (ammonia/sour) | Most common | Lack of brown material (too many greens) |
| Fruit flies | Very common | Food scraps left exposed on surface |
| Liner failure | Common | Leaving wet waste in caddy for extended periods (5+ days) |
| Mold | Less common | Excess moisture + poor airflow |
Key Observations
- The most frequent issue involves odor—and in almost every case, the root cause was a lack of brown material
- Fruit fly problems are almost always traced to food scraps left on the surface
- Liner failures typically result from leaving wet waste in the caddy for more than 4-5 days, not from liner quality
Customer Story: One of Our Customers in Illinois
One of our customers in Illinois contacted us after repeatedly experiencing liner failures with their kitchen caddy. They were using 30 GSM liners and emptying the caddy only once a week.
The problem:
The liner consistently tore when lifted on day 6 or 7. They assumed the liners were defective.
What we found:
Their household generated about 0.8 lbs of food scraps per day—mostly fruit peels, coffee grounds, and vegetable trimmings. After 6 days, the total weight of wet waste and accumulated liquid was significant. The liquid had pooled at the bottom of the caddy, weakening the liner over time.
The solution:
We suggested two changes:
- Switch to 40 GSM liners
- Empty the caddy every 3 days instead of weekly
The result:
They reported no further failures over the following 6 weeks. The issue wasn’t the liner quality—it was the combination of collection time and liner thickness.
Liner Performance Observations
Collection Time vs. Performance
Based on recurring product performance feedback from household users:
| Collection Time | Observed Performance |
|---|---|
| Within 24 hours | Liner integrity maintained; minimal moisture |
| 24-48 hours | Some liquid may pool at bottom |
| 48-72 hours | Higher risk of leakage and liner breakdown |
| 5-7 days | Liner may tear when lifted; odor becomes noticeable |
Liner Thickness Observations
Based on product performance across different household use cases:
| GSM | Observed Performance | Best For |
|---|---|---|
| 20-30 GSM | Adequate for light fruit scraps; more likely to fail after several days of collecting wet waste | Very light fruit scraps; not recommended for daily use |
| 40-60 GSM | Best balance of strength and compostability for typical household use | Most households |
| 70-80 GSM | Adds material cost without significant performance improvement | Heavy wet waste; adds cost without meaningful benefit |
How Long Does Indoor Compost Take?
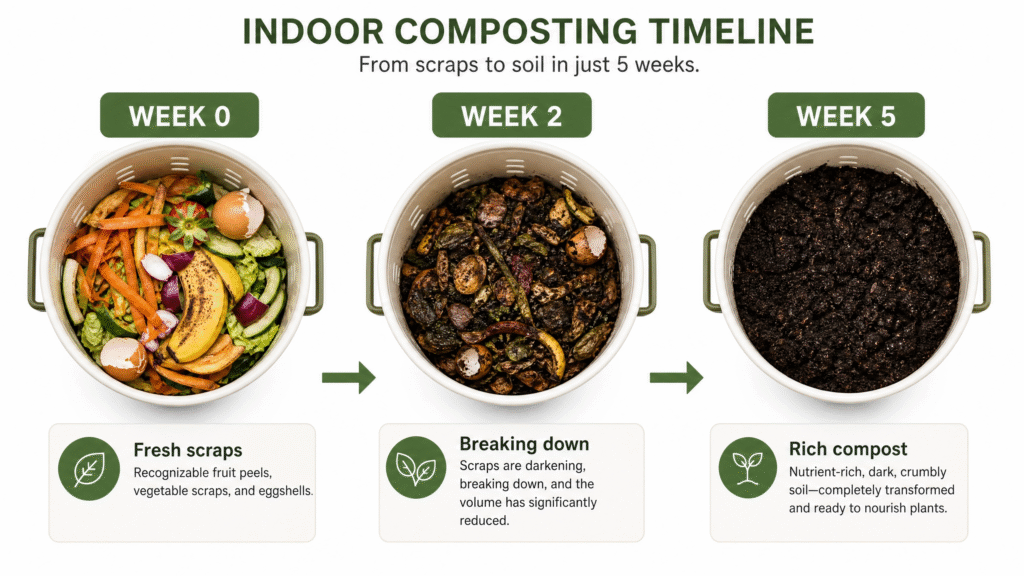
According to the EPA, an indoor compost bin should be ready in two to five weeks when properly managed.
| Method | Time to Finish | Notes |
|---|---|---|
| Aerobic composting | 2-5 weeks | EPA estimate for properly managed bins |
| Vermicomposting | 3-5 months | Depends on worm population and feeding |
| Bokashi | 2-4 weeks fermentation | Requires secondary breakdown |
| Electric composter | 4-24 hours | Produces dried scraps |
Indoor Composting Cost Breakdown
| Item | Estimated Cost | One-Time or Recurring? |
|---|---|---|
| Compost bin (aerobic) | $15-$40 | One-time |
| Worm bin + worms | $40-$70 | One-time |
| Bokashi bucket + starter | $40-$60 | One-time |
| Electric composter | $300-$600 | One-time |
| Kitchen caddy | $10-$25 | One-time |
| Compostable caddy liners (3-gallon) | $8-$12/month | Recurring |
| Bedding materials | Free | Free |
| Total (aerobic bin, first year) | ~$60-$100 | |
| Total (electric composter, first year) | ~$300-$600 |
Common Indoor Composting Mistakes
Mistake 1: Adding too much green material at once
Too many food scraps create ammonia smell. Always balance with browns. The EPA recommends an equal amount of browns to greens.
Mistake 2: Not burying food waste
Exposed scraps attract fruit flies. Cornell University recommends burying food scraps under bedding material to prevent pests.
Mistake 3: Ignoring moisture
Too wet = anaerobic rot. Too dry = slow decomposition. Use the wrung-out sponge test.
Mistake 4: Adding meat, dairy, or oily foods
These rot slowly and smell. According to the EPA, these materials create odor problems and attract pests.
Mistake 5: Not turning the compost
Without oxygen, decomposition slows and odors develop. Turn weekly.
Mistake 6: Leaving the bin in sunlight
Heat amplifies odor. Keep bins in cool, dark places.
Mistake 7: Adding materials that don’t break down
Avoid black walnut leaves (harmful to plants), coal ash (contains harmful substances), and diseased plants (may spread disease).
FAQ
Does indoor composting smell?
A properly managed indoor compost bin will not smell. According to the EPA, if you notice unpleasant odors, it’s usually a sign of imbalance—too much green material, insufficient aeration, or excess moisture.
Why does my indoor compost smell like ammonia?
This indicates too much green material. Add shredded cardboard or newspaper immediately. The EPA recommends an equal amount of browns to greens.
Why are worms crawling out of my bin?
Worms escape when conditions are too acidic, too wet, or too dry. Add crushed eggshells to neutralize acidity and adjust moisture levels. According to Cornell University, red wigglers need moisture, air, food, darkness, and warm temperatures to thrive.
Why is my compost moldy?
White mold is normal and beneficial. Black mold indicates too much moisture and poor airflow—add dry browns and turn the pile.
Can I compost cooked rice?
Yes, in moderation. Cooked grains break down but attract pests if left on the surface. Bury under bedding.
Can I compost onions?
Cornell University recommends avoiding onions and broccoli in worm bins, as they tend to have a strong odor. In aerobic bins, onions are acceptable in moderation.
Can I compost lemon peels?
Cornell University recommends avoiding orange rinds and other citrus fruits in worm bins, as they are too acidic and can attract fruit flies. In aerobic bins, citrus is acceptable in moderation.
Can I compost indoors without worms?
Yes. Aerobic composting uses microbes in soil to break down materials without worms.
What is the easiest indoor composting method?
For beginners, freezer storage + drop-off requires no setup. For active composting, aerobic bin composting with a tight-fitting lid is the simplest.
How often should I turn indoor compost?
Turn aerobic compost about once a week to promote aeration. Worm bins don’t need turning—worms aerate as they burrow.
Can I use compostable bags in my indoor bin?
Yes. Certified compostable kitchen caddy liners make collection cleaner. Look for TÜV Austria OK compost HOME certification (for home compost) or OK compost INDUSTRIAL (for commercial facilities).
Do I need special worms for vermicomposting?
Yes. Red wigglers (Eisenia foetida and Lumbricus rubellus) are best for indoor composting.
How much food waste can worms process?
One pound of red wigglers can consume roughly 1 pound of food waste per week. A half-pound of worms (about 500 worms) is enough to start a small bin.
What should I do with finished compost?
Use it for houseplants, garden beds, potting mix, or as mulch. It adds nutrients and improves soil structure.
How do I know when compost is finished?
Finished compost is dark brown, crumbly, and has an earthy smell. According to Cornell University’s worm composting guide, when your bin is filled with compost and very little bedding, it’s time to harvest. Volume shrinks by about 60-70%.
About the Author / Technical Review
Reviewed by:
Chris Xiang
Founder
HEMCBags
10+ years in compostable packaging manufacturing
ASTM D6400 / EN 13432 certified product lines
Supplying compostable liners to commercial and household customers
This guide was developed based on:
- U.S. Environmental Protection Agency composting guidelines
- Cornell Waste Management Institute publications
- TÜV Austria certification standards for compostable products
- Recurring customer support inquiries collected over the past decade
- Direct feedback from commercial distributors and household users
Continue Learning About Composting & Compostable Products:
If you’re exploring indoor composting and compostable products, these expert guides can help you learn more:
- Composting Basics: How to Start Composting at Home
- Can Compostable Bags Be Composted? Everything You Need to Know
- Home Compostable vs Industrial Compostable: What’s the Difference?
- Home Compost Certification: What You Need to Know
- Compostable Bags vs Biodegradable Bags: What’s the Difference?
- Compostable Bags Shelf Life: How Long Do They Last & Storage Tips
- What Types of Tea Bags Are Compostable?
Final Thoughts
Indoor composting is easier than most people think. With the right bin, balanced materials, and regular maintenance, you can turn kitchen scraps into nutrient-rich compost without the smell, mess, or hassle—even in a small apartment.
The EPA notes that a properly managed indoor compost bin will not attract pests and will not smell bad. The key is simple: balance greens with browns, keep it moist but not wet, and turn it regularly.